
What is Restrict.io? Restrict.io is a WordPress content restriction plugin. It locks posts, pages, categories and partial content, and lets you sell access through WooCommerce, WooCommerce Subscriptions, Easy Digital Downloads, Tickera and Venuera. It does not include its own payment processor or membership-level manager.
Restrict for WordPress includes a full WooCommerce content restriction integration, so you can show or hide content based on what a customer has actually purchased in your store. Once both plugins are active, you can lock entire pages and posts, individual sections of content, whole post categories, widgets and even menu items behind the purchase of any product or one specific product. This guide walks through every option the integration adds and how to set each one up.
Before you start: require customer accounts
Purchase-based restriction can only work if the customer buying through WooCommerce is a registered user. If someone checks out as a guest, your website has no way to connect that order to a logged-in visitor later on, so Restrict cannot verify their purchase.
To make sure every customer has an account:
- In your WordPress admin, go to WooCommerce Settings -> Accounts & Privacy.
- Make sure the option Allow customers to place orders without an account is unchecked. This prevents guest checkout entirely.
- For convenience, enable Allow customers to create an account during checkout so new customers can register as a natural part of the checkout process instead of having to sign up separately first.
With that in place, here are all the options available when Restrict and WooCommerce run on the same website.
Custom messages for WooCommerce content restriction
With WooCommerce installed, you will notice a new tab named WooCommerce inside the Restrict settings.

In this area you can set the custom messages shown to visitors who try to view content restricted by WooCommerce criteria they do not meet:
- Any product – displayed to users who have not purchased any product yet but are trying to view content that requires at least one WooCommerce purchase.
- Specific product – displayed to users who have not purchased the specific product required to access the content. You can use the
[rsc_woo_product]placeholder to show the title of the required product inside the message, or[rsc_woo_product_links]to show the product title as a link that takes the user straight to the product page where they can buy it. - Specific product (limited time) – displayed to customers who did purchase a product with a time-limited access period, but whose access time has now expired.
Well-written messages turn a locked page into a sales opportunity: instead of a dead end, the visitor sees exactly what to buy and a direct link to buy it.
Restrict a whole page or post
When restricting the content of an entire page or post, the Content Available To dropdown menu now contains an additional item named WooCommerce Users.
Selecting it reveals two options:
- Any product – the user must have purchased any WooCommerce product to access the content of this page or post.
- Specific product – the content is visible only to users who purchased a specific WooCommerce product, which you select below this option. You can also choose whether access lasts indefinitely or only for a limited time after purchase. If you select Limited time after purchase, you can set the number of days, hours and minutes. For a full walkthrough of this scenario, see the time-based content restriction guide.
Restrict part of the content with shortcodes
Sometimes you only want to lock a portion of a page – for example, a teaser stays public while the full article, video or download link is reserved for customers. When WooCommerce is active alongside Restrict, an additional area named WooCommerce Users appears in the Shortcodes tab of Restrict.
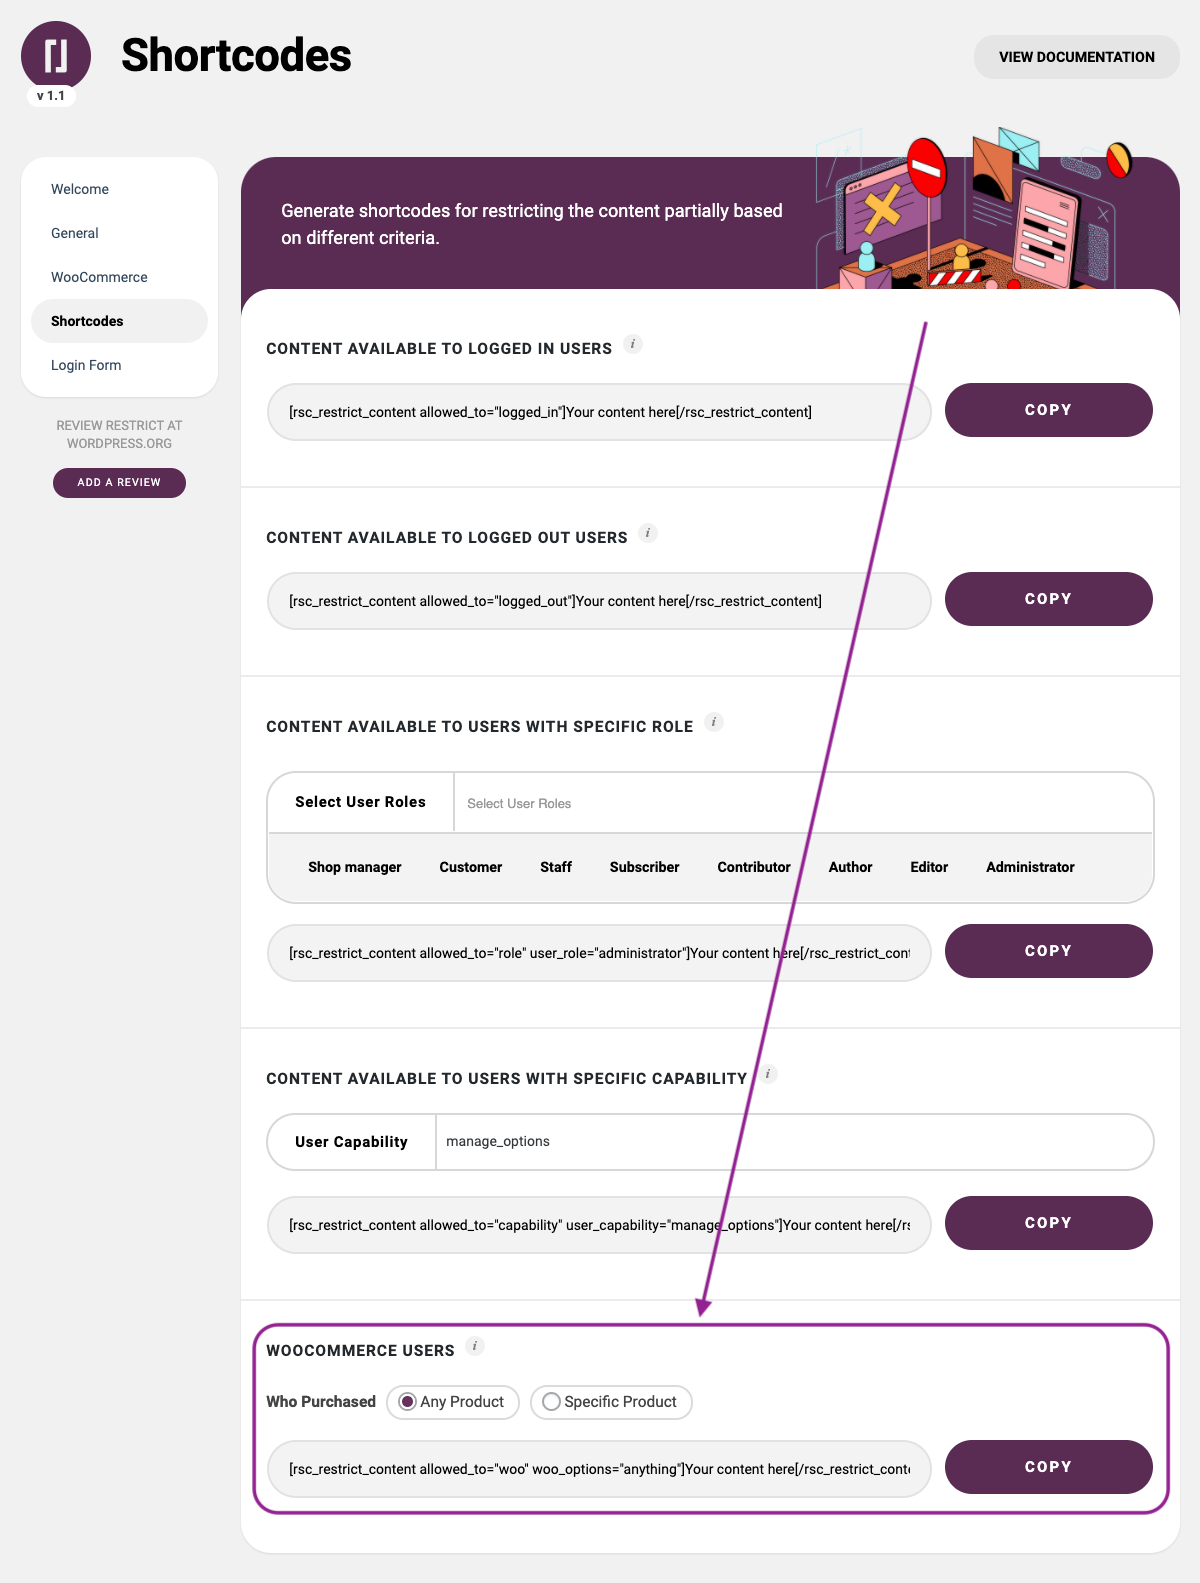
Here you select the WooCommerce criteria – any product, or one or more specific products – and Restrict generates the shortcode for you. You then wrap the shortcode around the content you want to protect. More details about using shortcodes can be found in the shortcodes documentation.
If needed, you can also add a custom message using the protected_message argument as part of the shortcode. For example:
[rsc_restrict_content allowed_to=”woo” woo_options=”anything” protected_message=”YOUR MESSAGE HERE”]Your content here[/rsc_restrict_content]Restrict post categories
When creating a new post category or editing an existing one, you can select WooCommerce Users to restrict the whole category using WooCommerce criteria. Every post in that category then inherits the same rule – ideal when you publish many posts for the same group of customers, such as lessons in a paid course.

You can read more about how category restriction works in the post category restriction guide.
Restrict widgets
You can also control widget visibility based on WooCommerce criteria. When creating a new widget or editing an existing one, select WooCommerce Users from the dropdown menu:

This option is available for every widget in every widget area of your website, so you can decide exactly which WooCommerce customers see which widget – for example, a members-only download widget in the sidebar.
Restrict menu items
Much like widgets, each menu item can be restricted as well. While adding or editing a menu item, select WooCommerce Users from the dropdown menu and then choose the WooCommerce criteria required for the menu item to be displayed.

This keeps your navigation clean: visitors who have not purchased yet simply never see links to customer-only areas.
What can you build with this?
The WooCommerce integration is the foundation for a range of business models on a plain WordPress site – no separate membership platform required. Popular examples include selling online courses, selling access to online yoga or fitness classes, and subscription-based access using the WooCommerce Subscriptions add-on.
The WooCommerce integration is part of Restrict for WordPress – see current plans and pricing for 1-site, 5-site and unlimited-site licenses, each available as a yearly subscription or a one-time lifetime payment.