
What is Restrict.io? Restrict.io is a WordPress content restriction plugin. It locks posts, pages, categories and partial content, and lets you sell access through WooCommerce, WooCommerce Subscriptions, Easy Digital Downloads, Tickera and Venuera. It does not include its own payment processor or membership-level manager.
This tutorial shows you how to set up WooCommerce Subscriptions content restriction with Restrict for WordPress: customers buy a subscription product, and they can access your restricted pages or posts only while that subscription stays active. The moment a subscription expires or is cancelled, access is revoked automatically – until the customer renews. By the end of this guide you will have a fully working, subscription-gated content system on your own WordPress site.
This setup is particularly interesting if you are, for example, selling online courses or other premium content and you do not want customers to keep access indefinitely after a single payment. Instead, they need an active, renewing subscription for continual access.
What you need
For this solution we will be using three plugins:
- Restrict for WordPress – the premium version is required, since we will be using its shortcodes. See plans and pricing (1-site, 5-site and unlimited licenses, yearly or one-time lifetime).
- WooCommerce – free, handles products, checkout and payments.
- WooCommerce Subscriptions add-on – a paid add-on that adds recurring subscription products to WooCommerce.
Make sure all three are installed and activated, and that you have enabled and configured at least one payment gateway for WooCommerce so customers can actually pay.
Step 1: Configure WooCommerce Subscriptions roles
Head to WooCommerce Settings -> Subscriptions tab and make sure that Subscriber Default Role and Inactive Subscriber Role have different roles selected. For example, if your default subscriber role is set to Subscriber, then your inactive subscriber role should be set to Customer (or any other role you see fit, as long as it differs from the default subscriber role).
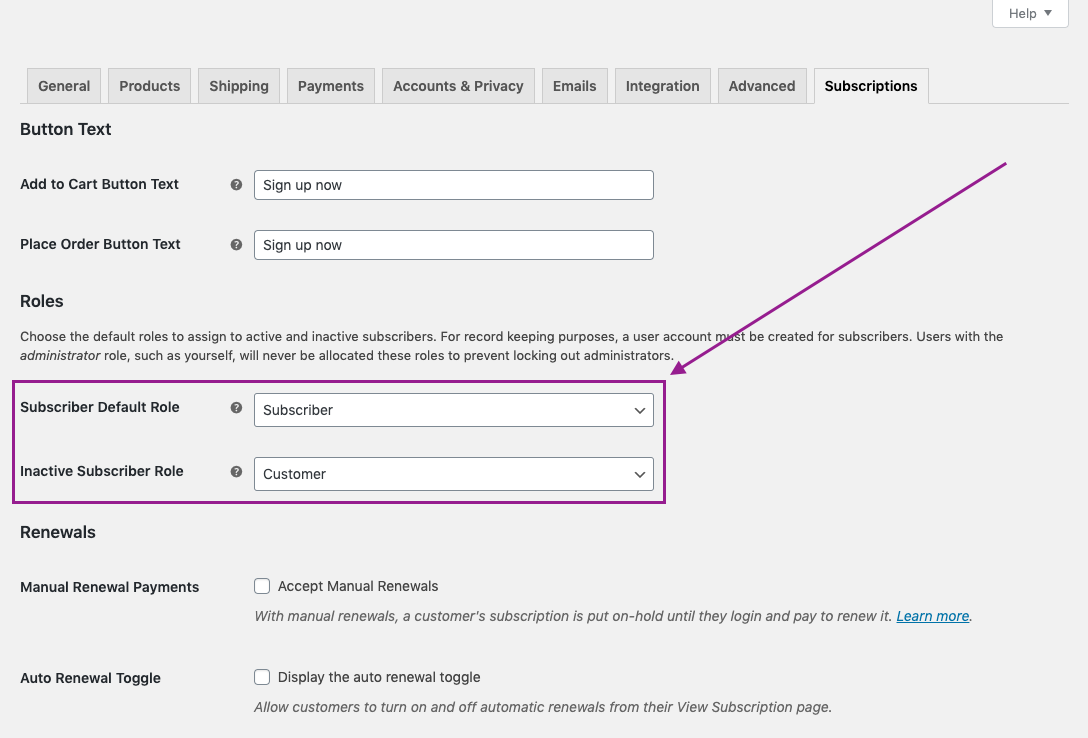
We will come back to why this matters later – for now, just make sure this change is in place. In short: WooCommerce Subscriptions switches a user between these two roles depending on whether their subscription is active, and Restrict will use that role as one of the access conditions.
Step 2: Create the subscription product
Now create a WooCommerce subscription product. In the example screenshot below, we have created a simple subscription product priced at $10 with a monthly renewal.

If your scenario calls for multiple pricing tiers, you can create several simple subscription products, or a variable subscription product with variations for the different options you offer. For the sake of simplicity, this tutorial sticks to a single simple subscription product.
Step 3: Generate a shortcode in Restrict
When your subscription product (or products) is ready, head to Restrict -> Shortcodes and scroll all the way down to the WooCommerce Users area. Select the Specific Product option, then pick the product (or multiple products) customers must purchase to view your restricted content. In the example below we selected a product titled My Online Course – the subscription product created in the previous step.

When you are done making your selection, click the Copy button to copy the auto-generated shortcode. If you are new to Restrict shortcodes, the shortcodes documentation explains how they work in general.
Step 4: Create the content page or post
This is where everything comes together. Create the page or post that will hold your premium content, and paste the shortcode you copied in the previous step into the content area:

To make the shortcode easier to understand, think of it in three parts. The opening part is:
[rsc_restrict_content allowed_to=”woo” woo_options=”product” woo_product=”95″]It is followed by the actual content (the part that says Your content here), and finally the closing part:
[/rsc_restrict_content]Whatever content you want to restrict goes between the opening and closing parts, right where Your content here is currently placed. Set up like this, the shortcode limits access to that content to customers who purchased the specific WooCommerce product defined in the shortcode. But this is only the first half of the story – the second half is what makes the subscription logic work.
Below the content area you will find Restrict’s Content Available To menu, which we will also use. Select Users with specific role, then choose the user role that matches the Subscriber Default Role you set in the WooCommerce Subscriptions settings. In our case, that is Subscriber.

With this, you are limiting access to the whole page only to users who currently hold the Subscriber role. And with that, you are basically done.
How WooCommerce Subscriptions content restriction works
What we actually created here are two different criteria for accessing the content, and a user must meet both:
- Purchased the specific subscription product – enforced by the Restrict shortcode wrapped around the content.
- Currently holds the active-subscriber role – enforced by the page-level Content Available To setting.
Why both? If we only checked the product purchase, customers could keep accessing the content even after their subscription expired – the purchase itself never goes away, which defeats the whole point of a subscription. If we only checked the user role, the content would be available to anyone who bought any subscription product on your site (since any of them grants the Subscriber role), not just the one tied to this content.
By combining both criteria, access requires the specific purchase and an active subscription. When the subscription expires, WooCommerce Subscriptions automatically switches the user to the inactive role you configured in Step 1, the role check fails, and access is revoked – until they renew and the role switches back.
Tips and variations
- Multiple tiers: create several subscription products and repeat Steps 3 and 4 per tier, wrapping each tier’s content with a shortcode that requires the matching product.
- Friendlier lockout messages: in the WooCommerce tab of Restrict settings you can customize the messages shown to visitors who do not meet the criteria – including a link to the product they need to purchase. The WooCommerce integration guide covers all message options and placeholders.
- Simpler alternative: if you do not need automatic recurring billing, you can achieve fixed-duration access (for example, 30 days after a one-time purchase) with plain WooCommerce using time-based content restriction – no Subscriptions add-on required.
Conclusion
Although this solution requires the premium version of Restrict (for the shortcodes) and the paid WooCommerce Subscriptions add-on, and takes a bit of tweaking, the result is a genuinely powerful subscription-based content restriction system suitable for online courses, member content, and any scenario where access should last only as long as the subscription does. For a complete course-selling walkthrough without the subscription component, see selling online courses on your website.