
Want to start a paid newsletter from your own WordPress website? In this real-life use case we will build one with three plugins: WooCommerce Subscriptions handles the recurring billing, and Restrict for WordPress locks the premium archive: older posts, premium editions and anything else only paying subscribers should read. An honest note before we start: Restrict is a content restriction plugin, not an email tool. It does not send your newsletter and it does not take payments. The emails go out through your email service provider, the billing runs on WooCommerce Subscriptions, and Restrict gates the content on your site: who can read the premium archive, and who gets locked out when a subscription lapses. By the end of this walkthrough you will have a working paid newsletter site, from the subscription plan to the locked archive.
How it works: Restrict.io locks your premium archive. WooCommerce Subscriptions handles the recurring billing, and Restrict grants access to paid subscribers automatically. Restrict does not send email – the newsletter goes out through an email provider, while Restrict gates the archive on your site.
Why a paid newsletter, and how it works
A paid newsletter is simple in concept: readers pay a recurring fee, and in return they get premium editions plus access to the archive of everything you published before. The model works because your best content keeps earning after the day it was published. New readers pay, old posts stay valuable, and you get predictable recurring revenue instead of one-off sales.
On WordPress it works like this. Your regular posts stay public and do their job: attracting readers. A portion of the archive, or an entire category of premium posts, is restricted to subscribers. WooCommerce Subscriptions collects the fee and manages the subscription lifecycle, and Restrict decides who can actually open the premium content. When a subscription is active, the subscriber gets in. When it expires, access goes away until they renew.
What you need
For this setup you need three things:
- A WordPress site, on any theme you like.
- WooCommerce. Free. Handles products, checkout and payments.
- WooCommerce Subscriptions. A paid add-on for WooCommerce that turns products into recurring subscriptions. Your newsletter plan will be a subscription product.
- Restrict for WordPress. The plugin that gates your premium archive to subscribers. It has 86,197 downloads and counting. For the shortcode part of this guide you need a premium license. Plans start at $39 per year for Restrict for WordPress, or $59 per year for the Bundle covering both plugins, with lifetime licenses available and a 7-day trial plus a 7-day money-back guarantee on every purchase.
Make sure all three plugins are installed and activated, and configure at least one payment gateway in WooCommerce so subscribers can actually pay.
Step 1: Create your subscription plan
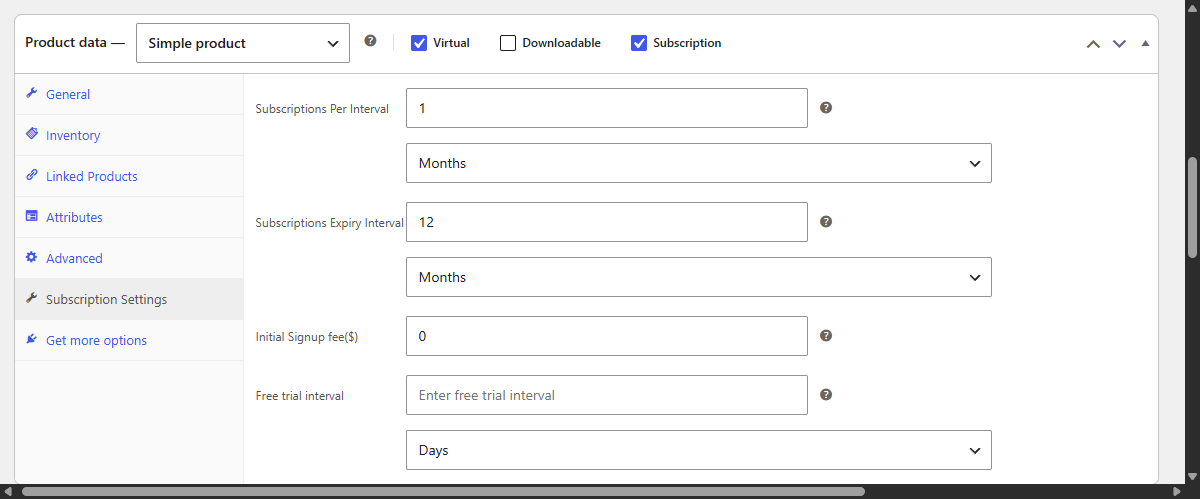
A newsletter plan is a subscription product. In WooCommerce, create a simple subscription product, give it a name (e.g. Premium Newsletter), set the price and the billing period: monthly or yearly, your call. If you plan multiple tiers, create a product per tier, or use a variable subscription product with variations.
Before you create anything, open WooCommerce Settings and go to the Subscriptions tab. Make sure Subscriber Default Role and Inactive Subscriber Role are set to different roles. For example, Subscriber for active subscribers, Customer for inactive ones. WooCommerce Subscriptions switches users between these two roles as their subscription becomes active or expires, and Restrict will use that role as one of the access conditions.
Step 2: Restrict the premium archive
Now decide what is premium. Two common approaches.
By category. If all your premium issues live in a category, say Premium, restrict the whole category. When creating or editing the category, look for the Posts from category visible to dropdown and select WooCommerce Users, then pick your criteria and the subscription product. Every post published in that category inherits the rule automatically, so you never lock a new issue by hand again.
By page or post. For older posts or individual editions, open the post, find the Content available to dropdown below the content area and set the same criteria: WooCommerce Users, Specific product, and your newsletter plan.
Either way, only subscribers who purchased the plan can open the content. The full category setup is covered in the post category restriction guide.
Step 3: Show a teaser before the lock
A paid newsletter lives or dies on what readers see before they pay. Keep the first part of each premium post public and lock the rest. That is the teaser, and it does the selling for you.
- Head to Restrict, then Shortcodes, and find the WooCommerce Users area.
- Pick your criteria and the newsletter product, and click Copy.
- Paste the generated shortcode into your post and wrap the premium part of the content between [rsc_restrict_content] and [/rsc_restrict_content].
The intro stays visible to everyone, the rest shows the restriction message with a link to the plan. Visitors read enough to want more, then subscribe. The shortcodes documentation explains the mechanics in general.
Step 4: Tie access to an active subscription
A subscription should mean access only while it lasts. Two checks make that work, and Restrict combines them.
The first check is the shortcode around the premium content, which requires the specific purchase. That alone is not enough: the purchase never disappears, so a customer would keep access forever after a single payment. The second check closes that gap. Below the content area, set Content available to to Users with specific role and pick the role that matches your Subscriber Default Role, Subscriber in our example. Only users currently holding that role can view the page.
Combined, the content requires the specific purchase and an active subscription. When a subscription expires, WooCommerce Subscriptions moves the user to the inactive role, the role check fails, and access is revoked until the subscriber renews. New subscribers get access automatically the moment their subscription becomes active, which is what makes the whole thing hands-off. The full walkthrough is in the WooCommerce Subscriptions content restriction guide.
Step 5: Menus and widgets for subscribers
The navigation should match who is looking. In WordPress, go to Appearance and open Menus. With Restrict active, every menu item has a Menu available to dropdown:
- Show an Archive link only to logged-in users, or to a specific role.
- Show a Subscribe item to logged-out visitors and hide it once they sign in.
- With WooCommerce installed, show menu items only to paying subscribers.
Widgets follow the same pattern: each widget has a Widget visible to dropdown, so a subscriber-only widget can sit in your sidebar without visitors seeing it.
One tip from the docs: hiding a menu item does not protect the page. Anyone with a direct link can still open it, so always pair menu visibility with actual page and post restriction. The menu items and widget visibility guides list all the criteria.
Conclusion
You now have a paid newsletter on WordPress: a subscription plan billed by WooCommerce Subscriptions, a premium archive locked by category or per post, teasers that sell the rest, automatic access for active subscribers and automatic lockout on expiry, and menus and widgets that adapt to the visitor. Your email service provider sends the editions, and the site holds the archive that keeps paying subscribers coming back.
Restrict is not an email platform and does not pretend to be one. It is the gatekeeper: 86,197 downloads, one job, works with the theme you already have. The same integration works with Easy Digital Downloads, and you can reserve content for Tickera and Venuera ticket holders, or personalize pages by URL parameter, referrer or cookie.
Restrict for WordPress starts at $39 per year, or $59 per year for the Bundle with both plugins. Lifetime licenses are available, and every purchase comes with a 7-day trial and a 7-day money-back guarantee. See the pricing page and pick the license that fits your site. Full setup details for every step are in the documentation.
Related documentation
- Content restriction based on the WooCommerce Subscriptions plugin
- Restricting access to post categories
- Using shortcodes to restrict part of the content
- Restricting the content of a page or post
- Restricting WordPress menu items by user role and login status
- Restricting visibility of WordPress widgets
- WooCommerce integration