
Want to build a content library on WordPress for your church or community? In this real-life use case we will create one with two or three plugins: WooCommerce takes the donations or membership payments if you collect them on the site, and Restrict for WordPress locks the library content: sermons, teaching series, resources and materials, visible only to your members. An honest note before we start: Restrict does not take donations and does not manage membership. It has no member directory and no dues ledger. It gates content: who can open the library, and who cannot. Donations and billing run through WooCommerce, or through Give if that is your donation tool, and Restrict simply checks the access you have already defined. By the end of this walkthrough you will have a working library, from the sermon categories to the locked member content.
How it works: Restrict.io locks your content library. Donations and purchases go through WooCommerce or another payment tool, and Restrict gives members or donors access to sermons, series and resources by role or purchase. Restrict does not take donations or manage membership – it only gates content.
Why a church or community locks content for members
Churches and community organizations share a lot of content: sermons, teaching series, small group materials, PDFs, audio recordings. Most of it can stay public, and should. But some of it is meant for the community: members’ resources, course materials for a program, content that should not float around the open web, and sometimes content that supports the church’s funding by giving members a reason to give.
A private library solves this without a separate platform. Members log in, find the sermon series or the resource they need, and everything else stays out of sight. No more emailing files, no more password-protected PDFs passed around in chats, and no more of your teaching materials ending up on other sites.
What you need
For this setup you need three things:
- A WordPress site, on any theme you like.
- WooCommerce or Give for the giving side. WooCommerce handles products and payments, and a membership or donor product is a clean way to define who is a member. Give is a popular donation plugin if that is what you already use.
- Restrict for WordPress. The plugin that gates your library to members. It has 86,197 downloads and counting. Plans start at $39 per year for Restrict for WordPress, or $59 per year for the Bundle covering both plugins, with lifetime licenses available and a 7-day trial plus a 7-day money-back guarantee on every purchase.
If you take payments on the site, configure at least one payment gateway, and you are ready.
Step 1: Organize the library by categories
The library starts with structure. Create categories that mirror how your community thinks: Sermons, Series, Resources, Small Groups, Courses. Then publish each item as a post in its category: a sermon with its audio or video embed, a series as a group of posts, a resource as a page with a download.
Categories matter here for the same reason they matter everywhere else with Restrict: you can lock an entire category with one setting instead of configuring every post by hand. Publish a new sermon into the Sermons category and it is protected automatically. For a library that grows every week, that is the difference between ten seconds of setup and ten minutes of clicking.
Step 2: Restrict the library to members
Now decide who is a member, and lock the library accordingly. Two honest ways, depending on how your community works.
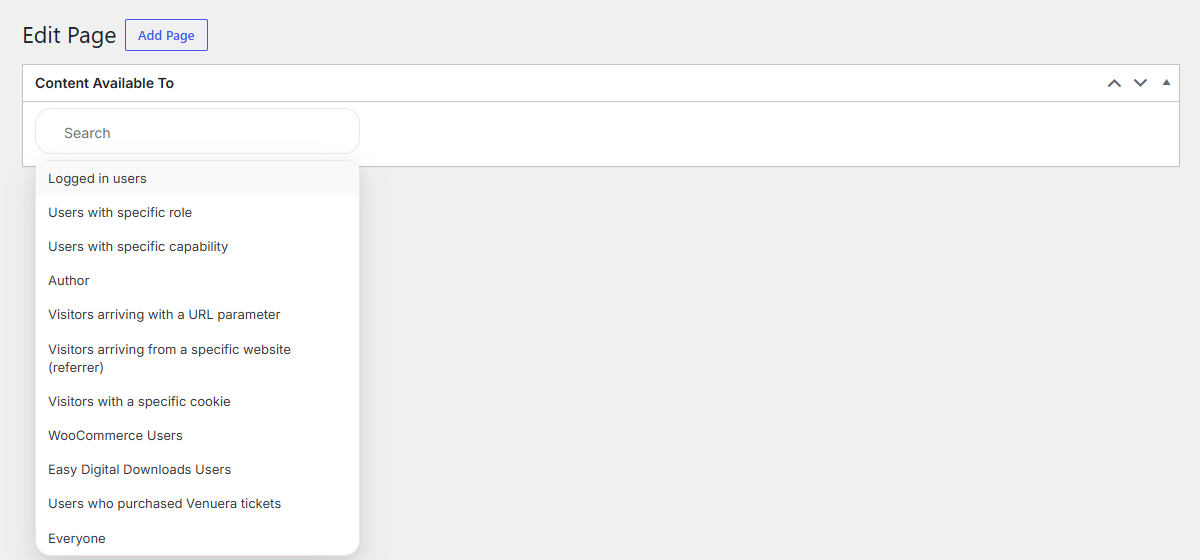
By role. If membership in your community is a simple role on the site, restrict the library to that role. When creating or editing a category, look for the Posts from category visible to dropdown, select Users with specific role, and pick the member role. Only users holding that role can open the content in the category.
By donation or purchase. If members are defined by giving, create a WooCommerce product (a monthly supporter membership, or a one-time donation product) and restrict the library to buyers of that product: select WooCommerce Users in the same dropdown, choose Specific product and pick the product. If you take donations through Give instead, keep it simple: grant your donors a role on the site, and use the role-based restriction above. Restrict checks the role; Give or WooCommerce handles the money.
Either way, non-members who reach a locked post see the restriction message instead of the content, which you can customize to explain how to join.
Step 3: Show a teaser, lock the content
A locked library that shows nothing invites no one. Keep a public intro on each item and lock the full content.
For a sermon, that means the title, the passage and a short description stay public, and the audio, video and full notes are locked. Head to Restrict, then Shortcodes, find the criteria that matches your setup (role or WooCommerce Users), pick your selection, and click Copy. Wrap the locked part of the post with the generated shortcode:
[rsc_restrict_content allowed_to=”woo” woo_options=”product” protected_message=”Join the library to hear this sermon”]Audio or video embed and full notes here[/rsc_restrict_content]
Visitors read the description and see the message with a join link. The teaser does the inviting, the gate does the joining. The shortcodes documentation explains the mechanics in general.
Step 4: Menus and widgets for members
The navigation should match who is looking. In WordPress, go to Appearance and open Menus. With Restrict active, every menu item has a Menu available to dropdown:
- Show a Library link only to logged-in users, or to the member role.
- Show a Join or Give link to logged-out visitors and hide it once they sign in.
- With WooCommerce installed, show menu items only to those who purchased the membership product.
Widgets follow the same pattern: each widget has a Widget visible to dropdown, so a member-only widget, like a recent resources list, stays out of the public sidebar. One tip from the docs: hiding a menu item does not protect the content. Anyone with a direct link can still open it, so always combine menu visibility with the actual restriction from Step 2. The menu items and widget visibility guides list all the criteria.
Step 5: Add a login for the community
Members will visit often, so make signing in painless. In the Restrict area of your back end, open the Login Form tab. Adjust the labels if you like, set a Redirect URL to the library, and copy the automatically generated shortcode. Paste it on a login page, or use the built-in Gutenberg block if you build with blocks.
Set the Redirect URL to the library landing page, and members land on their content the moment they sign in. The login form documentation walks through both options.
Conclusion
You now have a private content library on WordPress: sermons, series and resources organized by category, locked to members by role or by purchase, teasers that invite people in, menus and widgets that hide from non-members, and a login form that keeps the community inside your site.
Restrict does not take donations and does not manage membership, and it does not pretend to. It is the gatekeeper: 86,197 downloads, one job, works with the theme you already have. WooCommerce or Give handles the giving side, and Restrict checks the access. The same integration works with Easy Digital Downloads, and you can reserve content for Tickera and Venuera ticket holders, or personalize pages by URL parameter, referrer or cookie.
Restrict for WordPress starts at $39 per year, or $59 per year for the Bundle with both plugins. Lifetime licenses are available, and every purchase comes with a 7-day trial and a 7-day money-back guarantee. See the pricing page and pick the license that fits your site. Full setup details for every step are in the documentation.