
Want to sell photography presets online from your own WordPress website? In this real-life use case we will build a store for creative digital products, presets and design assets, with two or three plugins: Easy Digital Downloads or WooCommerce takes the payments and delivers the files, and Restrict for WordPress makes sure only customers who paid can see and download the content. An honest note before we start: Restrict does not host files and does not take payments. It never stores a Lightroom preset or a PSD, and it never touches the checkout. The selling and the file delivery are EDD’s or WooCommerce’s job. What Restrict does is gate the pages around those files: previews stay public, downloads stay for buyers. By the end of this walkthrough you will have a working store, from the preset pack to the locked download page.
How it works: Restrict.io locks your download content. Easy Digital Downloads or WooCommerce sells the preset pack or asset bundle, and Restrict makes sure only buyers see and download the files. Restrict does not host files or take payments itself.
Why sell creative digital products
Photography presets, SVG bundles, PSD mockups, Figma kits, fonts, textures: creative digital products sell themselves in a way physical goods cannot. There is no stock, no shipping, no packaging. You craft the pack once and sell it a thousand times. Photographers buy presets to skip hours of editing, designers buy asset bundles to skip hours of drawing. The buyer gets instant value, you get margin on every sale.
The catch is the same as with any digital goods: buyers expect to pay, download and be done, and they expect nobody else gets the files for free. The store part is easy. The gate part is what most people get wrong: a download link pasted into a public post stays public forever. This guide keeps the preview public and the download locked, which is the setup that actually sells.
What you need
For this setup you need three things:
- A WordPress site, on any theme you like.
- Easy Digital Downloads or WooCommerce. Free. Both handle products, checkout, payments and file delivery. EDD is built for digital products and keeps things minimal; WooCommerce works if you also sell physical goods in the same shop.
- Restrict for WordPress. The plugin that gates your downloads to buyers. It has 86,197 downloads and counting. For the shortcode part of this guide you need a premium license. Plans start at $39 per year for Restrict for WordPress, or $59 per year for the Bundle covering both plugins, with lifetime licenses available and a 7-day trial plus a 7-day money-back guarantee on every purchase.
Install your e-commerce plugin, configure at least one payment gateway so customers can actually pay, and you are ready.
Step 1: Create your preset pack or asset bundle
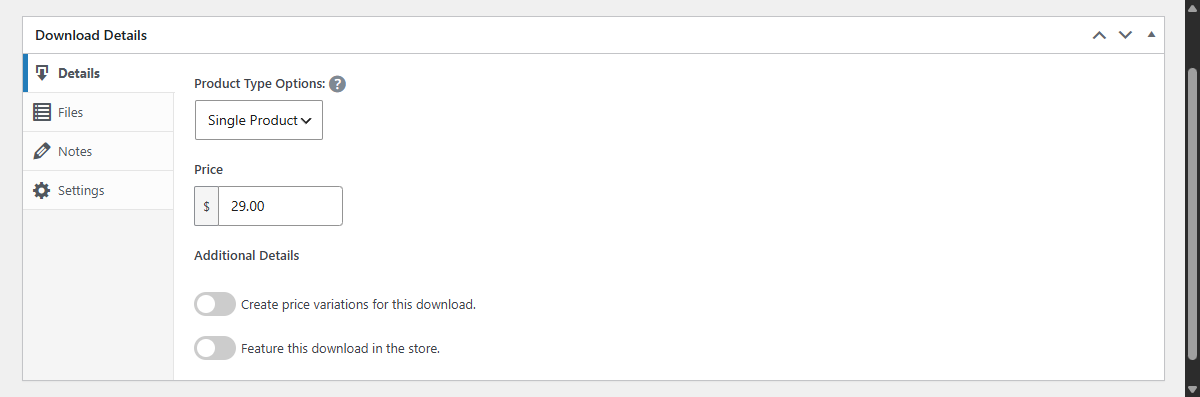
The product is a digital download. In Easy Digital Downloads, products are called Downloads: go to Downloads, click Add New, set the price and upload the files that make up the pack. In WooCommerce, create a product and tick the Downloadable box in the product data, then add your files there.
Name the pack well and price it fairly: that is the sales page, and it should do the convincing on its own. Add the preview images to the product page, so visitors see exactly what they are buying before they decide.
Step 2: Restrict the download content to buyers
The download page is where the sale happens, and where the gate goes. Create a page per product (or per bundle) that holds the download links, and lock it to buyers.
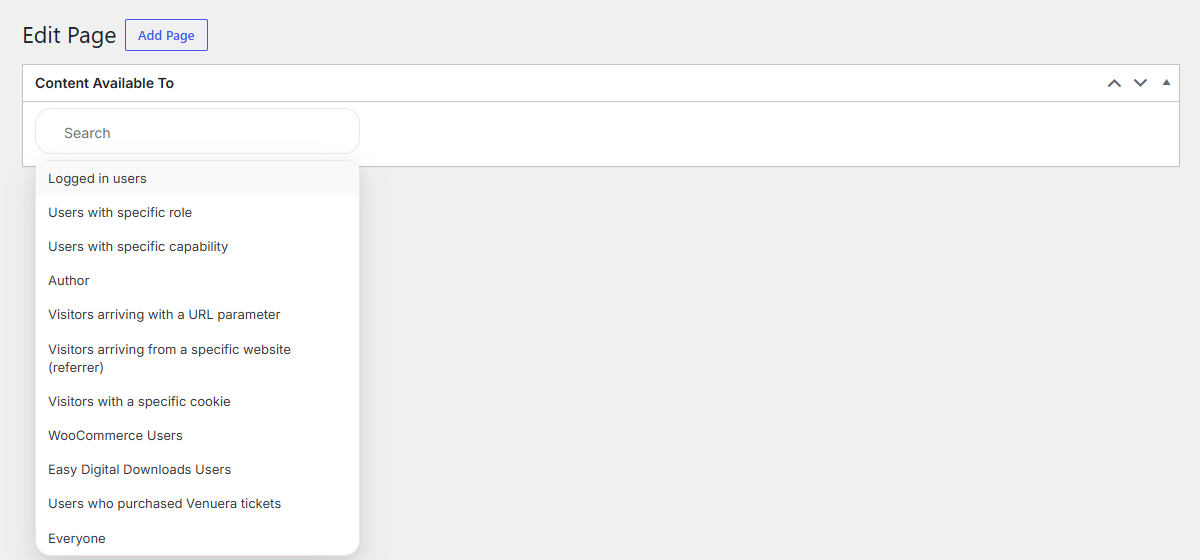
Open the page and find the dropdown labeled Content available to. Select Easy Digital Downloads Users, then choose Specific product and pick the pack this page belongs to. In WooCommerce the same dropdown offers WooCommerce Users with the same options. Save, and only customers who purchased that product can open the page.
The Any product option works for a shared download area covering everything you sell. For time-limited access, like a launch discount window, both integrations support a Limited time after purchase option, down to days, hours and minutes.
Buyers who somehow land on a page they have not paid for see the restriction message instead of the content. Set that message in the Easy Digital Downloads or WooCommerce tab inside Restrict settings, and include a link to the product: a locked page becomes the last push to buy.
Step 3: Protect the download links
Here is the honest division of work. EDD or WooCommerce delivers the actual files after a successful payment, with their own download handling. Restrict protects everything around the files: the pages where the download links live.
Keep the download links on restricted pages, never on public ones. A direct file URL posted in a blog post is a file given away. On the restricted download page, the link exists only for buyers, and non-buyers never see it, because they never see the page.
If you sell access that should expire, set Limited time after purchase and Restrict revokes access automatically when the window closes. For perpetual packs, leave access indefinite and the page stays open to buyers forever, which is also where you will point customers who lost a download.
Step 4: Show a preview gallery, lock the download
Presets and design assets sell on looks. A wall with no preview sells nothing. The standard pattern: the preview gallery is public, the download is locked.
Keep the product page and the preview images public, then lock the download section with a shortcode. Head to Restrict, then Shortcodes, find the Easy Digital Downloads or WooCommerce Users area, pick your criteria and the product, and click Copy. Wrap the download block with the generated shortcode:
[rsc_restrict_content allowed_to=”edd” edd_options=”product” protected_message=”Buy this pack to download”]Your download button and links here[/rsc_restrict_content]
Visitors scroll through the previews, hit the locked section, see the message with the buy link, and complete the sale. The preview does the marketing, the gate does the closing. The shortcodes documentation explains the mechanics in general.
Step 5: License terms and menus
Two finishing touches.
License terms. Add a page with your license terms: personal use, commercial use, resale rules, credits. You can keep it public, which is standard practice, or put a buyer-only version inside the download area if your license grants buyers extra rights. Either way, link it from the product page and from the download page, so there is never a question about what buyers can do with your work.
Menus. In WordPress, go to Appearance and open Menus. With Restrict active, every menu item has a Menu available to dropdown. Hide a Downloads or My Purchases link from visitors and show it only to logged-in users, or, with EDD or WooCommerce installed, only to customers who purchased a specific product. Widgets work the same way, each with a Widget visible to dropdown.
One tip from the docs: hiding a menu item does not protect the page. Anyone with a direct link can still open it, so always combine menu visibility with the actual page and post restriction. The menu items guide lists all the criteria.
Conclusion
You now have a store for photography presets and design assets on WordPress: a downloadable product billed and delivered by EDD or WooCommerce, download pages gated to buyers, protected links, a public preview gallery with a locked download, and a license page plus menus that keep the shop tidy. The setup scales: more packs, more bundles, time-limited launches, and a shared download area for repeat customers.
Restrict does not host your files and does not process payments, and it does not pretend to. It is the gatekeeper: 86,197 downloads, one job, works with the theme you already have. The same integration works with WooCommerce Subscriptions for paid preset clubs, and you can reserve content for Tickera and Venuera ticket holders, or personalize pages by URL parameter, referrer or cookie.
Restrict for WordPress starts at $39 per year, or $59 per year for the Bundle with both plugins. Lifetime licenses are available, and every purchase comes with a 7-day trial and a 7-day money-back guarantee. See the pricing page and pick the license that fits your site. Full setup details for every step are in the documentation.