
Want to build a paywall on WordPress for a magazine or publication? In this real-life use case we will set one up with three plugins: WooCommerce Subscriptions handles the subscription billing, and Restrict for WordPress locks the premium articles and shows the teasers. An honest note before we start: Restrict is a content restriction plugin, not a billing engine. It does not charge subscribers and it does not count their free article quota. It gates the content: full articles stay locked, the first paragraph stays public, and the right visitors get in. The subscription money runs through WooCommerce Subscriptions or Easy Digital Downloads. By the end of this walkthrough you will have a working paywall, from the subscription plan to the locked article archive.
How it works: Restrict.io locks your premium articles. WooCommerce Subscriptions handles the subscription, and Restrict shows a teaser to everyone while unlocking the full text for subscribers. Restrict is not a billing engine and does not count page views – it only controls who sees what.
How publishers monetize content
Publishers have two honest ways to make money from articles: advertising and subscriptions. Ads need traffic in huge volume, which most niche magazines do not have. Subscriptions need a reason to pay, and that reason is the content itself: readers pay for the full article, the archive and the consistency of a publication they trust.
A paywall is the mechanism in between. The hard version locks everything behind a subscription. The teaser version keeps the opening of every article public and locks the rest. The metered version lets readers sample a few articles for free each month before asking for money. All three are built from the same pieces: a subscription plan, a locked article, and a public teaser. That is exactly what this guide assembles.
What you need
For this setup you need three things:
- A WordPress site, on any theme you like.
- WooCommerce Subscriptions (with WooCommerce) or Easy Digital Downloads. WooCommerce Subscriptions handles recurring monthly or yearly plans; EDD works for simpler one-time or manual-recurrence setups. Pick what fits how you want to bill.
- Restrict for WordPress. The plugin that locks your premium articles. It has 86,197 downloads and counting. For the shortcode part of this guide you need a premium license. Plans start at $39 per year for Restrict for WordPress, or $59 per year for the Bundle covering both plugins, with lifetime licenses available and a 7-day trial plus a 7-day money-back guarantee on every purchase.
Install your billing plugin, configure at least one payment gateway, and you are ready.
Step 1: Create the subscription plan
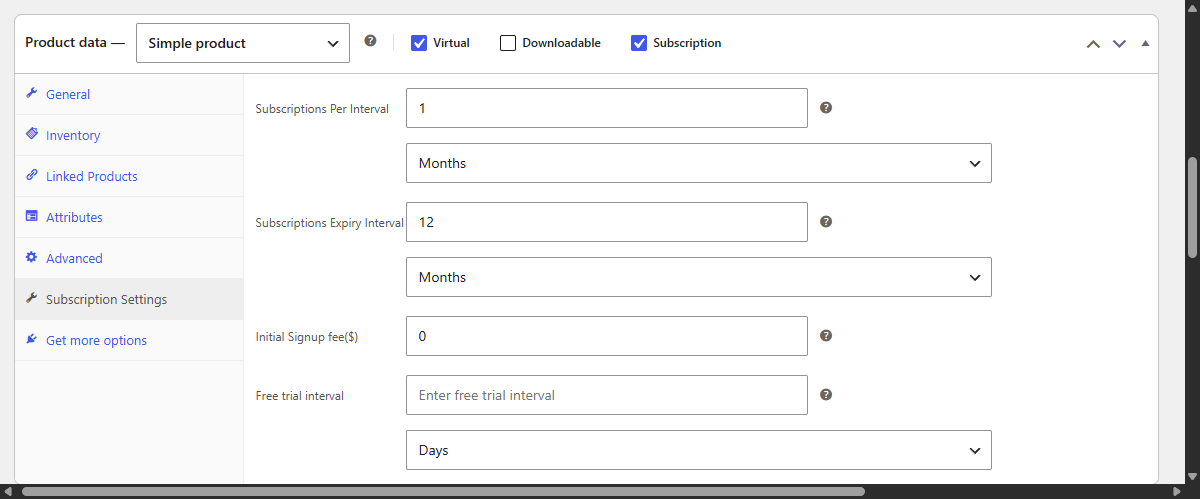
A magazine subscription is a subscription product. In WooCommerce, create a simple subscription product, give it a name (e.g. Monthly Subscription), set the price and the billing period, monthly or yearly. If you offer both, create one product per plan, or use a variable subscription product with monthly and yearly variations.
Then open WooCommerce Settings and go to the Subscriptions tab. Make sure Subscriber Default Role and Inactive Subscriber Role are different roles, for example Subscriber for active and Customer for inactive. WooCommerce Subscriptions switches users between these roles as their subscription becomes active or expires, and Restrict uses the active role as one of the access conditions.
Step 2: Lock the premium articles
Now decide what is premium. In a magazine, the simplest rule: the full text of every article is premium, and the first part is the teaser.
Restrict the full articles by category. Create a category for your paid content, or mark existing premium posts, and set the restriction on the category level. When creating or editing the category, look for the Posts from category visible to dropdown, select WooCommerce Users, pick Specific product and choose your subscription plan. Every article published into that category inherits the rule automatically, so you never lock a new issue by hand again. The post category restriction guide covers the settings.
Alternatively, restrict individual articles: open the post, find the Content available to dropdown, and set the same criteria per post. That works, but for a publication that publishes regularly, the category route saves you the clicking.
Step 3: Show the teaser, lock the full text
A paywall that hides everything shows readers nothing. Keep the opening of each article public and lock the rest. That opening paragraph is your best salesperson: it proves the writing is worth paying for.
- Head to Restrict, then Shortcodes, and find the WooCommerce Users area.
- Pick your criteria and the subscription product, and click Copy.
- Paste the generated shortcode into the article and wrap everything after the first paragraph between [rsc_restrict_content] and [/rsc_restrict_content].
The first paragraph stays visible to everyone. The rest shows the restriction message, where you can include a link to the subscription plan, so readers hit the paywall already knowing what they get for the money. The shortcodes documentation explains the mechanics in general.
Step 4: Metered access with a cookie
The metered model gives readers a few free articles per month before the paywall kicks in. It is friendlier than a hard lock and converts better, because readers get hooked before they are asked to pay.
Here is the honest version of how this works with Restrict. Restrict does not count article views. What it does is check a cookie: a page or a section of content can be shown only to visitors who carry a specific cookie. That is the building block of a meter, and it is a verified Restrict criterion.
The counting is done by whatever sets the cookie. In the Content available to dropdown, select Visitors with a specific cookie and enter the cookie name, for example free_articles_used. A visitor without that cookie sees the teaser; a visitor with it sees the locked content. Set the cookie on the visitor’s browser once they have read their free allowance this month, using your analytics tool or a small script, and Restrict enforces the result automatically. If you use a dedicated metering service, many of them set exactly such a cookie, and Restrict plugs into it.
The same binary logic works with the other visitor criteria: URL parameter (yoursite.com/article/?free=1) for free links shared from social media, or referrer for articles opened from partner sites. The landing page personalization guide covers all three criteria and the matching rules.
Step 5: Menus and login for subscribers
Two touches keep subscribers happy and visitors pointed at the paywall.
Login. Put the login where it is needed. Copy the login form shortcode from the Login Form area of Restrict and paste it into the restriction message, so a returning subscriber can sign in right on the article page and read it immediately. The login form documentation covers the details.
Menus. In WordPress, go to Appearance and open Menus. With Restrict active, every menu item has a Menu available to dropdown: show an Archive link only to logged-in users or a specific role, show a Subscribe link only to logged-out visitors, and with WooCommerce installed, show menu items only to paying subscribers. One tip from the docs: hiding a menu item does not protect the article, so always combine menu visibility with the actual restriction from Step 2. The menu items guide lists all the criteria.
Conclusion
You now have a paywall on WordPress: a subscription plan billed by WooCommerce Subscriptions or EDD, premium articles locked by category, teasers that keep the first paragraph public and sell the rest, metered access enforced through the cookie criterion, and a login form plus menus that keep subscribers inside your site. The setup scales from a small niche magazine to a full publication with multiple plans.
Restrict is not a billing engine and does not pretend to be one. It is the gatekeeper: 86,197 downloads, one job, works with the theme you already have. The same integration works with Easy Digital Downloads, and you can reserve content for Tickera and Venuera ticket holders.
Restrict for WordPress starts at $39 per year, or $59 per year for the Bundle with both plugins. Lifetime licenses are available, and every purchase comes with a 7-day trial and a 7-day money-back guarantee. See the pricing page and pick the license that fits your site. Full setup details for every step are in the documentation.
Related documentation
- Content restriction based on the WooCommerce Subscriptions plugin
- Using shortcodes to restrict part of the content
- Landing page personalization: URL parameter, referrer and cookie criteria
- Restricting access to post categories
- Login form: add a WordPress login form to any page or post
- Restricting WordPress menu items by user role and login status