
Want to create a client portal on WordPress? In this real-life use case we will build one for an agency or freelancer with two or three plugins: WooCommerce or Easy Digital Downloads handles the billing side, and Restrict for WordPress locks the portal content: contracts, files, reports, project updates, each visible only to the client it belongs to. An honest note before we start: Restrict is a content restriction plugin, not a project management tool. It does not track tasks and it does not take payments. It gates pages: only the right client sees the right content. The billing runs through WooCommerce or EDD, and Restrict decides who gets in. By the end of this walkthrough you will have a working client portal, from the client package to the locked project pages.
How it works: Restrict.io locks your portal pages. WooCommerce or Easy Digital Downloads sells the client package, and Restrict makes sure each client sees only their own content. Restrict is not a project-management tool – it gates pages, files and menus.
Why build a client portal
If you run an agency or work as a freelancer, you have probably lived this: deliverables sent by email, files re-sent because the link expired, a shared drive folder that mixes up every project you ever worked on, and the occasional “please ignore that page” email when a client wanders where they should not. A client portal fixes all of it in one move.
Each client gets their own pages: contracts, invoices, reports, deliverables. They log in, see exactly their project and nothing else, and download what they need without asking you for it. You stop emailing files, stop re-sending links, and stop worrying about a client seeing another client’s numbers. The portal is private, per client, and it runs on the WordPress site you already have.
What you need
For this setup you need three things:
- A WordPress site, on any theme you like.
- WooCommerce or Easy Digital Downloads. Free. Both handle products, checkout and payments. Pick the one you already use for your billing.
- Restrict for WordPress. The plugin that gates your portal pages to the right clients. It has 86,197 downloads and counting. Plans start at $39 per year for Restrict for WordPress, or $59 per year for the Bundle covering both plugins, with lifetime licenses available and a 7-day trial plus a 7-day money-back guarantee on every purchase.
Install your e-commerce plugin, configure at least one payment gateway, and you are ready.
Step 1: Create a product per client
In this setup, a client is a product. Open WooCommerce or EDD and create one product per client: a retainer, a project package, or whatever you invoice them for. Give it a name only you and the client recognize, for example Acme Corp Retainer.
Two ways to price it. If the client pays through your site, set the real price and billing period, and use WooCommerce Subscriptions if the retainer renews. If you invoice outside the site, set the price to zero and use the product purely as an access marker: the client never buys it, but Restrict still uses it to identify who is who. Either way, the product is the key that opens that client’s pages.
Step 2: Restrict portal pages by purchase
Now build the portal. Create the pages each client should see: a dashboard page, project pages, file and report pages. Then lock them per client.
Open a client’s dashboard page and find the dropdown labeled Content available to. Select WooCommerce Users (or Easy Digital Downloads Users if you use EDD), then choose Specific product and pick that client’s product. Save, and the page is visible only to customers who purchased that product. Repeat for every page that belongs to this client, and repeat the whole thing for every client.
The Any product option exists too, for pages all clients share, like a general contact or FAQ page. And if you use time-limited engagements, the integrations let you set access to last only a limited time after purchase, so the portal closes itself when the engagement ends.
Clients who somehow reach a page they are not entitled to see the restriction message instead of the content, which you can customize in the WooCommerce or Easy Digital Downloads tab inside Restrict settings.
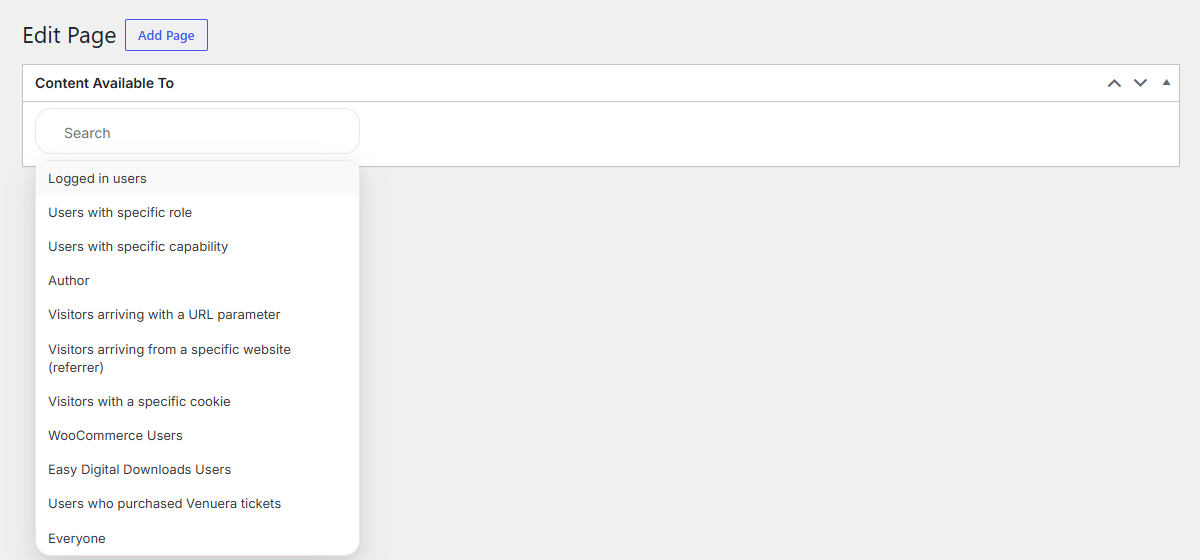
Step 3: Personalize pages per client
Not every visitor should see the same version of a page. Restrict ships with three visitor-based criteria that need no login at all, which are handy for portal extras:
- Visitors arriving with a URL parameter. Send each client a link like yoursite.com/welcome/?client=acme, and that page shows only when the parameter is present.
- Visitors arriving from a specific website. Content appears only when the referrer contains the text you enter, useful for links coming from a partner or from the client’s own email.
- Visitors with a specific cookie. Handy for returning visitors or consent-based content.
Set them in the same Content available to dropdown, or in premium shortcodes for partial personalization:
[rsc_restrict_content allowed_to=”url_parameter” url_parameter_key=”client” url_parameter_value=”acme”]Welcome, Acme Corp[/rsc_restrict_content]
The landing page personalization guide covers the criteria and matching rules in detail.
Step 4: Hide menus and widgets from non-clients
A portal link visible to everyone is a door with a sign on it. Keep navigation clean instead.
In WordPress, go to Appearance and open Menus. With Restrict active, every menu item has a Menu available to dropdown. Set your Client Portal links to Logged in users, or to a specific role, so visitors never see them. With WooCommerce or EDD installed, you can show a menu item only to customers who purchased a specific product, which is exactly the portal logic from Step 2.
Widgets behave the same way: each widget has a Widget visible to dropdown, so a client-only widget, like a file download list, stays out of the public sidebar.
One tip from the docs: hiding a menu item does not protect the page. Anyone with a direct link can still open it, so always pair menu visibility with the actual page and post restriction. The menu items and widget visibility guides list all the criteria.
Step 5: Add a login form for clients
Clients will open the portal constantly, so make signing in painless. In the Restrict area of your back end, open the Login Form tab. Adjust the labels if you like, set a Redirect URL to the client’s dashboard, and copy the automatically generated shortcode. Paste it on your portal login page, or use the built-in Gutenberg block if you build with blocks.
With the Redirect URL set to the dashboard, a client lands on their content the moment they sign in, no extra clicks. The login form documentation walks through both options.
Conclusion
You now have a private client portal on WordPress: one product per client, portal pages locked by purchase, personalized welcome pages by URL parameter, referrer or cookie, clean menus and widgets that hide from non-clients, and a login form that keeps clients inside your site. No more emailed files, no more shared folders, no more mixed-up projects. Each client sees exactly their portal and nothing else.
Restrict is not a project management platform and does not pretend to be one. It is the gatekeeper: 86,197 downloads, one job, works with the theme you already have. The same integration works with WooCommerce Subscriptions for retainers, and you can reserve content for Tickera and Venuera ticket holders.
Restrict for WordPress starts at $39 per year, or $59 per year for the Bundle with both plugins. Lifetime licenses are available, and every purchase comes with a 7-day trial and a 7-day money-back guarantee. See the pricing page and pick the license that fits your site. Full setup details for every step are in the documentation.
Related documentation
- Restricting the content of a page or post
- Landing page personalization: URL parameter, referrer and cookie criteria
- Login form: add a WordPress login form to any page or post
- Restricting WordPress menu items by user role and login status
- Restricting visibility of WordPress widgets
- WooCommerce integration
- Easy Digital Downloads integration