Show/hide content to users with specific meta value
Restrict For Elementor
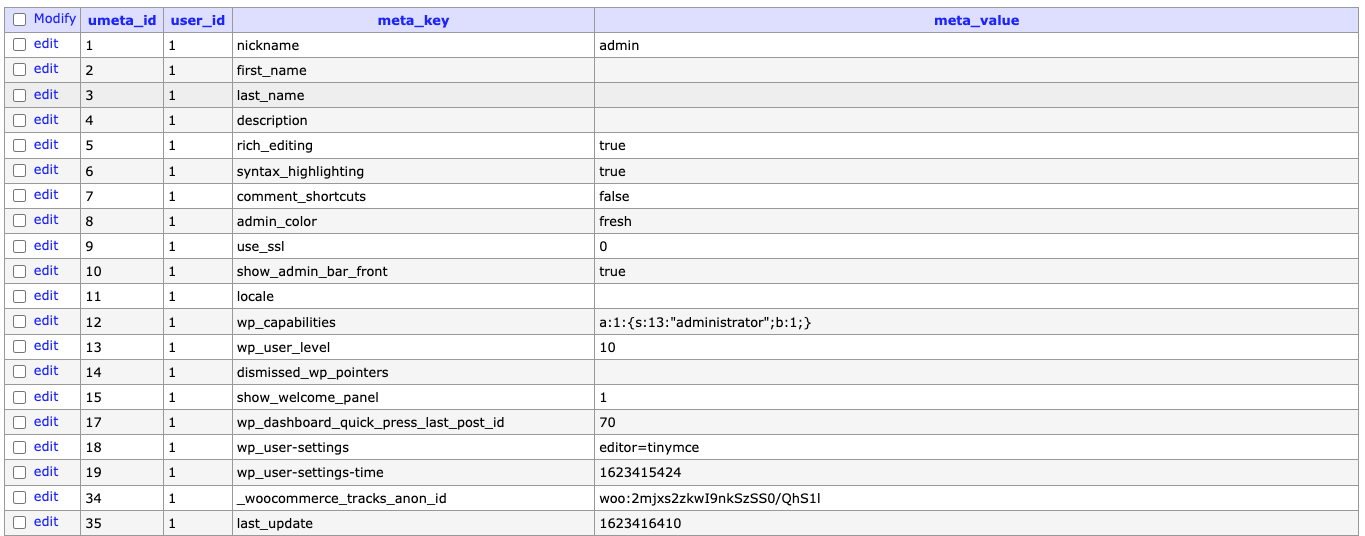
Each user account in WordPress has a set of certain meta values stored with specific meta keys. For example, some of default WordPress’ meta keys are nickname, first_name, last_name, etc. and these are used to store a corresponding data about each user. Beside WordPress’ default meta data, there might be some additional meta keys provided by some plugins. For example, WooCommerce can store information about the number of orders that user made on the website and will use _order_count meta key for that to store meta value which is the number of orders that user made. To get the whole idea what user meta data is available on your website, you can access the database of your website and then load wp_usermeta table (provided that you’re using default “wp_” prefix for the tables on your website) and then search for the user by their ID which will then show all the meta data for that user.
Knowing this, you might be getting the idea how this is useful as criteria for content restriction using this criteria with Restrict for Elementor. Now, add to this an option to use logic operators such as =, !=, <, >, etc. and you have one quite powerful way for showing or hiding certain section, column or widget on your page built with Elementor.
Let’s see what options do we have at disposal with this show/hide criteria for sections, columns and widgets in Elementor.
As mentioned earlier, you can use meta key, so this will be the first field that you will need to fill in. To use specific meta key, you should enter the key exactly the way it is entered in the database of your website or it won’t work. So, again, the best way to make sure that you’re using properly named meta key, you should access the database of your website (using phpMyAdmin, Adminer or similar).

Example table – this might look different depending on which database management tool you’re using.
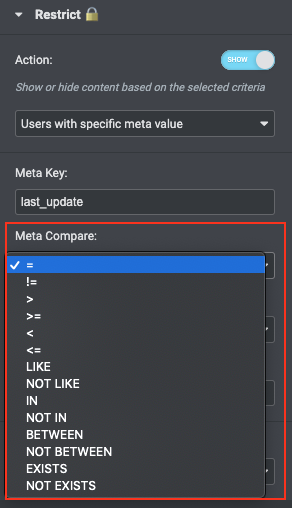
Once you enter the meta key to Meta Key field in Restrict for Elementor, three new fields will be revealed. First one is the Meta Compare. This is the logical operator that you will be using to compare the meta value you have enter to the Meta Value field with. Below is the explanation of what each of these operators does:
- = – the meta value is equal with the meta value you have entered to Meta Value field
- != – the meta value is not equal with the meta value you have entered to Meta Value field
- > – the meta value is larger than the meta value you have entered to Meta Value field
- >= – the meta value is equal or larger than the meta value you have entered to Meta Value field
- < – the meta value is lower than the meta value you have entered to Meta Value field
- <= – the meta value is equal or lower than the meta value you have entered to Meta Value field
- LIKE – the meta value is similar to the meta value you have entered to Meta Value field – eg. if the value entered is “John”, all the values similar to that will be accepted (“Johnson”, “Johndoe”, “Johna”,…)
- NOT LIKE – the meta value is different than the meta value you have entered to Meta Value field – eg. if the value entered is “John” all the values that do not contain “John” will be accepted (“Smith”, “Wilson”, “Doe”,…)
- IN – the meta value is within the array you have entered – eg. if you enter to Meta Value field “John, Steven, Lucy, Amber” only these values will be accepted
- NOT IN – the meta value is not within the specified array – eg. if you enter to Meta Value field “John, Steven, Lucy, Amber” all the values except for these entered will be accepted.
- BETWEEN – the value is between entered values – enter start and end values separated by comma to Meta Value field – eg. 10,15 will accept values 11, 12, 13 and 14
- NOT BETWEEN – the value is not between start and end values (separated by comma) entered to Meta Value field – eg. 10, 15 will accept all the values except for 11, 12, 13 and 14
- EXISTS – checks if entered meta key exists for that user and shows/hides the content if it does
- NOT EXISTS – checks if entered meta key exists for that user and shows/hides the content if it doesn’t exist

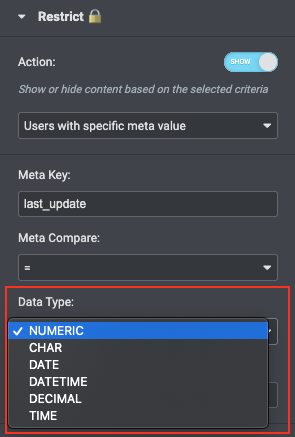
Another dropdown menu you have is the Data Type. In this dropdown, you should select the data type of the meta value you’re working with:
- NUMERIC – use when meta values are stored as numeric values
- CHAR – use when meta values are stored as character strings
- DATE – use when meta values are stored as date value
- DATETIME – use when meta values are stored as date and time value
- DECIMAL – use when meta values are stored as decimal values
- TIME – use when meta values are stored as time value

Okay, we completely understand that all this sounds quite intimidating and quite frankly, it is a bit on advanced side. However, let’s put this to some perspective with the couple of examples.
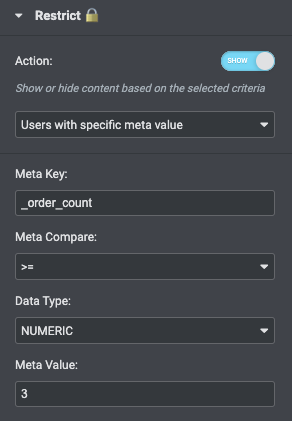
Let’s say that you want to show Elementor text widget to users who made three or more orders in WooCommerce on your website. To do this, we will enter _order_count to Meta Key field and then select >= operator from Meta Compare dropdown menu, select NUMERIC from Data Type dropdown menu and enter 3 as Meta Value.

What we did here is that we have told Elementor to display this widget if the logged in user has a number 3 or larger (this comes from the operator >=) stored as value with the meta key _order_count in the user meta of their account. If this condition is returned as true, the text widget will be displayed for that user.
Lastly, if the user does not fulfill criteria, you can select to display the alternative content to them. More about this option can be found here.